Installing sod in extreme temperatures—whether scorching heat or freezing cold—requires careful planning and execution. Unlike moderate conditions, extreme weather can stress the grass, slow root development, and even cause permanent damage if not handled correctly. The key lies in timing, preparation, and post-installation care tailored to the temperature extremes.
High heat accelerates moisture loss, making it harder for sod to establish roots before drying out. On the other hand, freezing temperatures can halt root growth entirely, leaving the sod vulnerable to frost heave and winterkill. Understanding these challenges helps you take the right steps to ensure survival.
Choosing the right grass type is also critical. Warm-season varieties like Bermuda grass and Zoysia sod handle heat better, while cool-season grasses like Kentucky bluegrass struggle in extreme summer temperatures. Similarly, installing sod in winter requires cold-tolerant species and protective measures to prevent frost damage.
Pre-Installation Preparation for Extreme Heat
Before laying sod in high temperatures, soil preparation becomes even more crucial. Dry, compacted soil will wick moisture away from the roots, so aerating and adding organic matter helps retain water. A soil test is highly recommended to check for proper pH levels and nutrient balance, as stressed sod needs optimal conditions to establish.
Water the ground thoroughly a day before installation. This prevents the soil from immediately sucking moisture out of the sod rolls, which can cause rapid dehydration. If possible, schedule delivery for early morning or late afternoon to avoid exposing the sod to midday heat during transport and installation.
Selecting heat-resistant sod varieties improves success rates. Bermuda grass, St. Augustine sod, and Zoysia sod are better suited for hot climates compared to cool-season grasses. If you must use less heat-tolerant varieties, plan for extra irrigation and shade protection during the first few weeks.
Installing Sod in Extreme Heat
The moment sod is harvested, its stress levels rise—heat speeds up this process. To minimize shock, work quickly. Lay sod immediately upon delivery, avoiding long exposure to direct sunlight. If delays are unavoidable, keep the pallets in a shaded, cool area and lightly mist them to prevent drying.
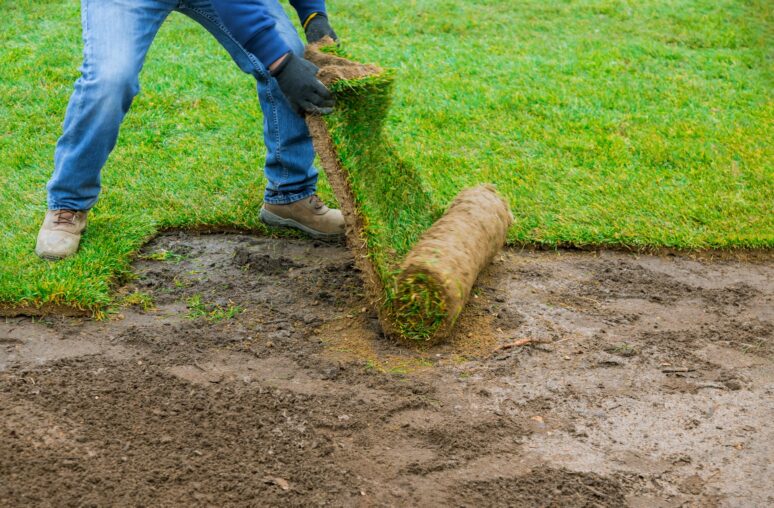
When laying the sod, stagger the seams like brickwork to prevent gaps where heat can penetrate and dry out the edges. Butt the pieces tightly together without overlapping, as air pockets can cause the sod to dry unevenly. Immediately after laying a section, walk over it to ensure good soil contact, which helps roots access moisture faster.
Watering begins the second the first piece is down. In extreme heat, sod needs light, frequent watering—sometimes every 30 minutes for the first few hours—to prevent scorching. After the initial soaking, switch to deeper, less frequent irrigation to encourage root growth while keeping the surface from overheating.
Post-Installation Care in High Temperatures
The first two weeks are critical. Unlike moderate weather, where sod can establish with minimal intervention, extreme heat demands vigilant monitoring. Water deeply in the early morning and late evening to reduce evaporation loss. Avoid midday watering, as droplets can act like magnifying glasses, burning the grass blades.
Limit foot traffic entirely for at least two weeks. Heat-stressed sod is fragile, and any pressure can disrupt root development. If possible, provide temporary shade using shade cloth or even patio umbrellas for particularly vulnerable sections. This reduces surface temperature and moisture loss.
Watch for signs of heat stress, including browning edges, curling blades, or a bluish-gray tint. If these appear, increase watering frequency but avoid waterlogging, which can suffocate roots. Once the sod shows steady growth and resists light tugging, gradually reduce watering to encourage deeper root systems.
Pre-Installation Preparation for Freezing Conditions
Installing sod in freezing weather is risky but sometimes unavoidable. The biggest threat is frost heave, where freezing and thawing cycles push the sod out of the ground before roots can anchor. To counter this, soil should be unfrozen and workable at installation time. If the ground is frozen, postpone the project.
Pre-warm the soil by covering the area with black plastic for a few days before installation. This absorbs sunlight and raises the temperature slightly, giving roots a better chance. Adding a thin layer of compost can also help insulate the soil and provide nutrients that encourage early root growth.
Choose cold-hardy sod varieties like tall fescue or Kentucky bluegrass, which tolerate frost better than warm-season grasses. Avoid installing sod when temperatures are expected to drop below freezing within the first 48 hours, as newly laid sod has no frost resistance.
Installing Sod in Freezing Temperatures
Timing is everything when laying sod in cold weather. Aim for a stretch of mild days (above freezing) to allow roots some time to establish before the next freeze. If a sudden cold snap is forecast, cover the sod immediately with frost blankets or straw to insulate it.
Lay sod quickly and efficiently, minimizing exposure to cold air. Keep rolls covered until the moment they’re placed, as cold winds can freeze the roots in minutes. Avoid working on frozen ground, as the sod won’t make proper contact with the soil, leaving gaps where cold air can penetrate.
Water lightly after installation—just enough to settle the sod without creating ice. Excess moisture can freeze and damage the grass. If temperatures drop unexpectedly, a light sprinkling of water before the freeze can actually help; the ice layer acts as insulation against colder air.
Post-Installation Care in Cold Weather
Unlike heat, where frequent watering is key, cold-weather sod needs careful moisture balance. Too much water leads to ice formation, while too little lets the sod dry out and die. Water only during the warmest part of the day, allowing time for absorption before nightfall.
Avoid walking on frozen sod, as the blades become brittle and can snap. If snow falls, leave it in place—it acts as a natural insulator. However, remove ice sheets that form over the grass, as they block oxygen and sunlight.
Monitor the sod closely in early spring. Winter-installed sod may appear dormant but should green up once temperatures rise. If some areas fail to recover, spot-replace them rather than redoing the entire lawn. With proper care, cold-weather sod can establish successfully, though it may take longer than spring or fall installations.
Final Tips for Extreme Temperature Sod Installation
Regardless of heat or cold, the best strategy is prevention. Whenever possible, schedule sod installation during milder seasons—spring and fall are ideal for most grass types. If extreme temperatures are unavoidable, adjust your approach based on the specific challenges of heat or cold.
Always consult with your sod supplier about the best varieties for your climate and the expected weather during installation. They may recommend holding off on delivery if conditions are too harsh. Remember, even the highest-quality sod can fail if installed at the wrong time.
Patience is crucial. Sod installed in extreme weather may take longer to establish, but with the right techniques, it can still thrive. Monitor progress closely, adapt care routines as needed, and don’t hesitate to seek professional advice if problems arise. A little extra effort upfront ensures a healthy, resilient lawn for years to come.